{{συγγραφέας}}
{{απόσπασμα λέξεων = "100"}} ... Διαβάστε περισσότερα
{{{σελιδοποίηση}}}
{{/αν}} ο blogging πλατφόρμα Ghost έχει πάρει πολύ μεγάλη προσοχή πρόσφατα λόγω της πρόσφατης μετάβασης από το βήτα στην κυκλοφορία του κοινού (αν κάπως δεν το έχετε ακούσει ακόμα, επικεφαλής εδώ και διαβάστε).
Όπως και σε άλλες πλατφόρμες, το Ghost υποστηρίζει "θέματα" τρίτων. Σε αυτό το άρθρο θα σχεδιάσουμε ένα απλό, ευαίσθητο και φιλικό προς το περιεχόμενο ιστολόγιο. Στη συνέχεια, κωδικοποιήστε το σε ένα πλήρως λειτουργικό θέμα για το Ghost.
Το προεπιλεγμένο θέμα για το Ghost, 'Casper', είναι πολύ καθαρό. Έβαλαν πρώτα το περιεχόμενο, δείχνοντας την τυπογραφία με μια μοντέρνα χρωματική παλέτα, έτσι ώστε να επικεντρωθεί στην γραφή.
Θα ακολουθήσουμε αυτό το προβάδισμα, οπότε η διαδικασία σχεδιασμού μας πρέπει να ξεκινήσει με την κατανόηση του τρόπου λειτουργίας του Ghost και του τι είναι διαθέσιμο στο χρήστη στο back-end. Υπάρχουν 4 βασικά στοιχεία που θα μπορέσουμε να αντλήσουμε από το back-end κατά τη σχεδίαση του θέματος (εκτός από τα ίδια τα άρθρα / τις θέσεις προφανώς) τα οποία είναι:
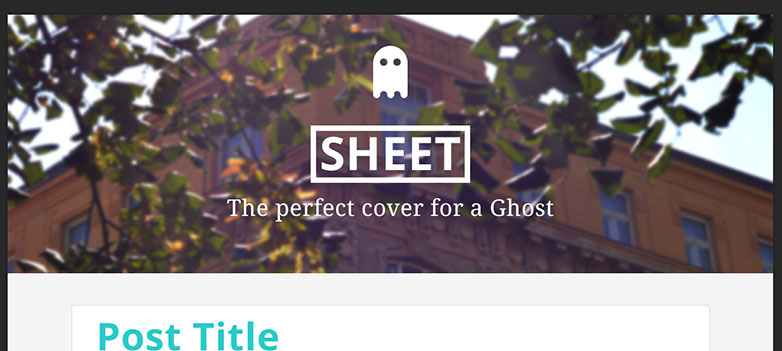
Όλα τα οποία μπορούν να οριστούν στην καρτέλα Ρυθμίσεις στο Ghost. Αυτά δείχνουν το σχεδιασμό σε μια προφανή κατεύθυνση από κάποιο είδος πανό στο πάνω μέρος της σελίδας, το οποίο περιέχει τον τίτλο, το λογότυπο και την περιγραφή και μια εικόνα εξώφυλλου ως φόντο.
Επομένως, πρέπει μόνο να σχεδιάσουμε 2 σελίδες, αυτή είναι η αρχική σελίδα, η οποία εμφανίζει όλες τις τελευταίες δημοσιεύσεις και την μεμονωμένη σελίδα μετά. Καθώς ο σχεδιασμός είναι σχετικά απλός, θα εμφανίσω πρώτα την τελική σελίδα και στη συνέχεια θα ξαναρχίσω τις λεπτομέρειες. Έτσι, εδώ είναι η σελίδα "home" που εμφανίζει τις πιο πρόσφατες αναρτήσεις:

Όπως μπορείτε να δείτε, πολύχρωμα σημεία, μαζί με βασικό και καθαρό σχεδιασμό. Ας δούμε ξανά τις λεπτομέρειες. Έχουμε λοιπόν την κεφαλίδα, που περιέχει το λογότυπο (εδώ έχω φτιάξει μια μικρή φορεσιά για ένα φάντασμα), το όνομα του blog και την περιγραφή.
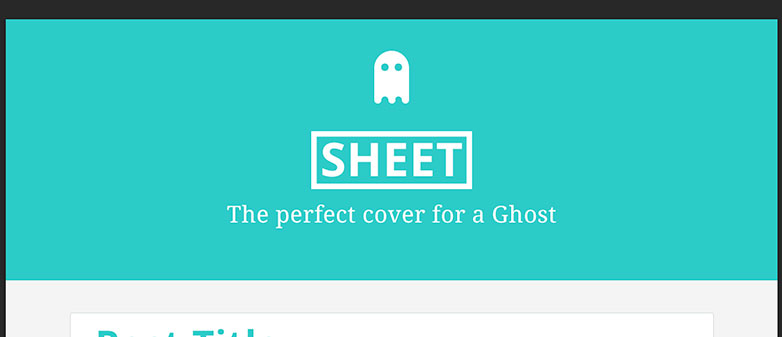
Έτσι, αν ο χρήστης επιλέξει μια φωτογραφία εξώφυλλου, θα το βάλουμε εδώ ως εικόνα φόντου πλήρους πλάτους. Εάν όχι, θα πάμε για ένα στερεό μπλε χρώμα που θα είναι το χρώμα μας highlight όπως παραπάνω.
Στη συνέχεια, έχουμε κάποιες θυρίδες περιεχομένου στις οποίες θα εμφανιστούν όλες οι πληροφορίες για κάθε θέση (τίτλος, ημερομηνία δημοσίευσης, συγγραφέας, ετικέτες) και το απόσπασμα.
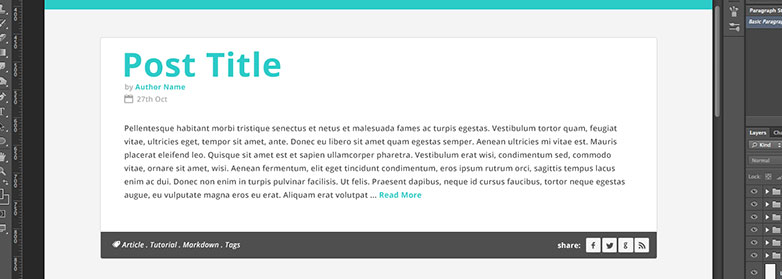
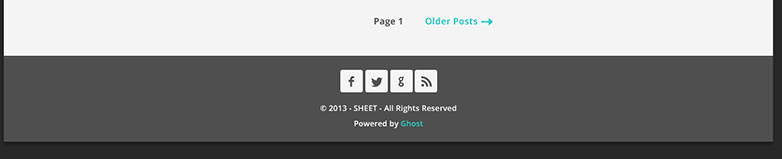
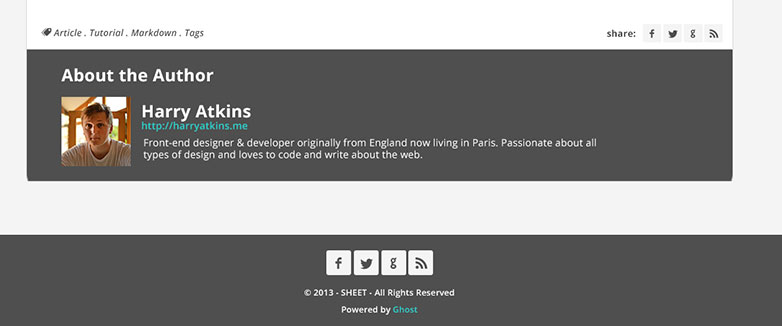
Τέλος κάνουμε μια απλή σύνδεση σελίδας και ένα υποσέλιδο. Στο πλαίσιο κοινής χρήσης άρθρου, το υποσέλιδο και όλα σε ολόκληρο τον ιστότοπο χρησιμοποιούμε μια προσαρμοσμένη γραμματοσειρά εικονιδίων που δημιουργήθηκε στο Fontello και τη γραμματοσειρά Ανοίξτε το Sans από τις γραμματοσειρές Google Web. Που θα δούμε πώς να το εφαρμόσουμε αργότερα.
Αυτό το σχέδιο είναι πολύ παρόμοιο με την αρχική σελίδα. Εκτός από το μπλοκ στο οποίο περικλείσαμε το απόσπασμα πριν, θα τεντώσει τώρα το πλήρες ύψος και θα δείξει όλο το περιεχόμενο. Επιπλέον, θα προσθέσουμε ένα κουτί συγγραφέα στο κάτω μέρος.
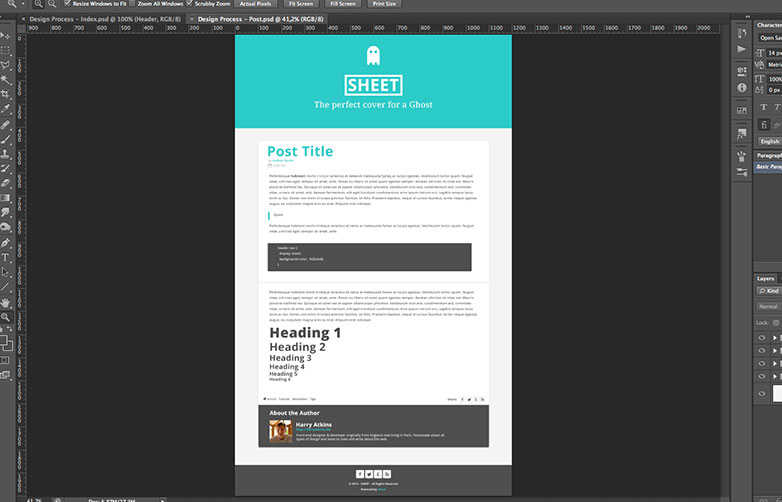
Έτσι όλα τα ίδια, εκτός από κάποια inline κείμενο styling που θα πάμε στο στάδιο της ανάπτυξης. Και εδώ είναι το νέο κουτί συγγραφέα:
Εντάξει, οπότε τώρα το σχέδιο έχει εξεταστεί (και προφανώς προσαρμόζεται στις δικές σας προτιμήσεις). Ήρθε η ώρα να ξεκινήσετε την ανάπτυξη. Πρώτα απ 'όλα, αν δεν το έχετε κάνει ήδη, πάρτε ένα δευτερόλεπτο και διαβάστε το επίσημο φάντασμα τεκμηρίωση για τη δημιουργία θεμάτων. Είναι πολύ σαφείς και σύντομες σχετικά με το τι χρειάζεται και τη δομή των αρχείων και ούτω καθεξής. Βασικά για αυτό το σεμινάριο, μπορούμε να χωρίσουμε την ανάπτυξη σε δύο στάδια. Περιεχόμενο και στυλ. Όπως μια βασική σχέση μεταξύ HTML και CSS, θα κάνουμε το θέμα να λειτουργήσει και στη συνέχεια να το κάνει να μοιάζει με το σχέδιό μας.
Για να ξεκινήσετε θα πρέπει να έχετε εγκατεστημένο το Ghost τοπικά στο μηχάνημά σας. Αυτό είναι σχετικά απλό να κάνουμε, και υπάρχουν τώρα ακόμη και αυτόματες εγκαταστάτες (όπως αυτό ). Μόλις εγκατασταθεί και τρέξει, θα πρέπει να βρούμε το φάκελο φάντασμα που ονομάζεται 'ghost-version.number' (κατά τη στιγμή της γραφής είναι 'ghost-0.3.2'). Μόλις εντοπιστεί, μεταβείτε στο 'περιεχόμενο / θέματα', εκεί θα θελήσετε να δημιουργήσετε ένα νέο φάκελο με το όνομα του θέματος σας. Έτσι σε αυτή την περίπτωση θα το ονομάσουμε 'φύλλο'. Μέσα από αυτό το φάκελο, θα φτιάξουμε 2 αρχεία που είναι απαραίτητα για ένα θέμα Ghost. Αυτό είναι 'index.hbs' και 'post.hbs', εάν έχετε διαβάσει την τεκμηρίωση Ghost (ή έχετε χρησιμοποιήσει Handlebars αλλού), θα αναγνωρίσετε τη μορφή αρχείου '.hbs' που σημαίνει ότι μπορούμε να χρησιμοποιήσουμε τα αποκαλούμενα 'τιμόνια' : {{}} στο πρότυπο μας.
Μετά από αυτό, θα προσθέσουμε ένα άλλο αρχείο που ονομάζεται 'default.hbs' και μια δομή φακέλου για τα στοιχεία και τα μερικά αρχεία μας. Ακολουθήστε αυτή τη δομή αρχείου:
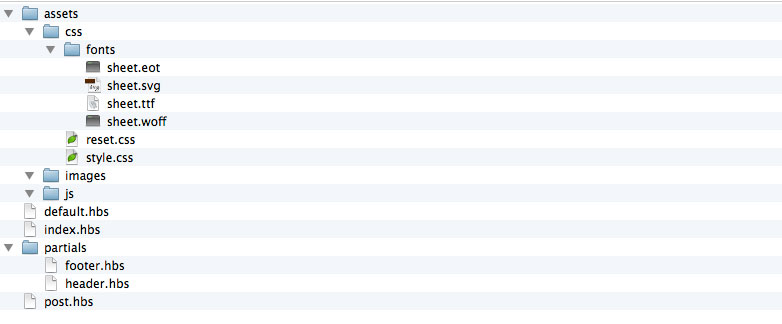
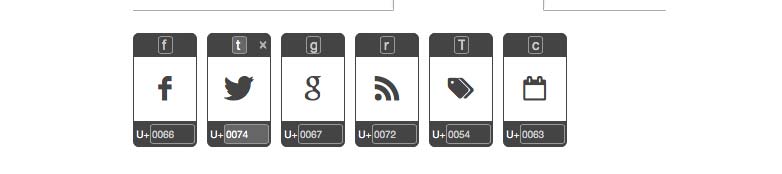
Στο 'assets / css / fonts' θα τοποθετήσουμε τα αρχεία γραμματοσειράς εικονιδίων για την εφαρμογή @ font-face. Για αυτό το σχέδιο έχω επιλέξει μόνο 6 εικονίδια: Facebook, Twitter, Google, RSS, Ετικέτες, Ημερολόγιο.
Εκτός από αυτό, τα υπόλοιπα αρχεία είναι αρκετά αυτονόητα. Τώρα ας πάρουμε τον κώδικα. Θα εξετάσουμε πρώτα τα δύο βασικά αρχεία του θέματος.
Όσο για τα σχέδια, θα δώσω πρώτα ολόκληρο το περιεχόμενο του αρχείου, τότε θα σπάσουμε τα σημαντικά κομμάτια. Πρώτα από όλα το αρχείο index.hbs:
{{!< default}}{{> header}}{{#foreach posts}}{{συγγραφέας}}
{{απόσπασμα λέξεων = "100"}} ... Διαβάστε περισσότερα
{{/ foreach}} {{# αν σελίδωση}} {{{σελιδοποίηση}}} {{/αν}} {{> υποσέλιδο}} So to explain what's happening, the very first line is essential to the theme and tell us that this file will be inserted into the content area into the default file. The second line then inserts our header. Instead of putting it into this file we'll create a partial file later in the 'partials' directory. HBS files are just like HTML files in which you can include normal HTML elements. So the next element in the file is a which will hold all of our main content. Then inside of the repeater we'll put our article element that will contain the post. Inside each there will be a with the title and the meta data of the article (author and publish date). After that the actual excerpt. Then a that has our post's tags (in between an 'if' statement) and the share links, with some span's calling in our icon font. Finally we have some pagination, and we eventually call in the which works like the header. So as you can see it's relatively simple code. Obviously any class or ID names are optional for CSS styling. Next up comes the 'post.hbs' file. Which is mostly similar, but with a few additions and modifications. /">← Go Back {{title}} by {{author}} {{date format='DD MMM YYYY'}} {{content}} {{#if tags}} Tags: {{tags separator=" . "}} {{/if}} Share: {{#if author}} About the Author {{#if author.image}} {{/if}} {{author.name}} {{#if author.website}} {{author.website}} {{/if}} {{author.bio}} {{/if}}{{/post}} {{> footer}} Once again we have the and handlebars. And our element. But this time the wrapping handlebar is Then we call in the (Not excerpt, because this is the individual page we want to show all of the content in the post.) Another difference here is the 'if' statement which is verifying if there's an author for the post. If there is we'll show a box with the author's image, name, URL and bio. All of these elements are editable in the back-end by the user, and will either show up or not depending on whether they exist. 'default.hbs' and the partial files Now we're going to look at the default.hbs file. So if you haven't made it yet, create a new file. In that file we're going to put all the default things that are needed for our page to display correctly in a browser, mainly the doctype and the , and tags. {{ghost_head}} {{{body}}} {{ghost_foot}}
{{!< default}} So to explain what's happening, the very first line is essential to the theme and tell us that this file will be inserted into the content area into the default file. The second line then inserts our header. Instead of putting it into this file we'll create a partial file later in the 'partials' directory. HBS files are just like HTML files in which you can include normal HTML elements. So the next element in the file is a which will hold all of our main content. Then inside of the repeater we'll put our article element that will contain the post. Inside each there will be a with the title and the meta data of the article (author and publish date). After that the actual excerpt. Then a that has our post's tags (in between an 'if' statement) and the share links, with some span's calling in our icon font. Finally we have some pagination, and we eventually call in the which works like the header. So as you can see it's relatively simple code. Obviously any class or ID names are optional for CSS styling. Next up comes the 'post.hbs' file. Which is mostly similar, but with a few additions and modifications. /">← Go Back {{title}} by {{author}} {{date format='DD MMM YYYY'}} {{content}} {{#if tags}} Tags: {{tags separator=" . "}} {{/if}} Share: {{#if author}} About the Author {{#if author.image}} {{/if}} {{author.name}} {{#if author.website}} {{author.website}} {{/if}} {{author.bio}} {{/if}}{{/post}} {{> footer}} Once again we have the and handlebars. And our element. But this time the wrapping handlebar is Then we call in the (Not excerpt, because this is the individual page we want to show all of the content in the post.) Another difference here is the 'if' statement which is verifying if there's an author for the post. If there is we'll show a box with the author's image, name, URL and bio. All of these elements are editable in the back-end by the user, and will either show up or not depending on whether they exist. 'default.hbs' and the partial files Now we're going to look at the default.hbs file. So if you haven't made it yet, create a new file. In that file we're going to put all the default things that are needed for our page to display correctly in a browser, mainly the doctype and the , and tags. {{ghost_head}} {{{body}}} {{ghost_foot}}
{{> header}} So to explain what's happening, the very first line is essential to the theme and tell us that this file will be inserted into the content area into the default file. The second line then inserts our header. Instead of putting it into this file we'll create a partial file later in the 'partials' directory. HBS files are just like HTML files in which you can include normal HTML elements. So the next element in the file is a which will hold all of our main content. Then inside of the repeater we'll put our article element that will contain the post. Inside each there will be a with the title and the meta data of the article (author and publish date). After that the actual excerpt. Then a that has our post's tags (in between an 'if' statement) and the share links, with some span's calling in our icon font. Finally we have some pagination, and we eventually call in the which works like the header. So as you can see it's relatively simple code. Obviously any class or ID names are optional for CSS styling. Next up comes the 'post.hbs' file. Which is mostly similar, but with a few additions and modifications. /">← Go Back {{title}} by {{author}} {{date format='DD MMM YYYY'}} {{content}} {{#if tags}} Tags: {{tags separator=" . "}} {{/if}} Share: {{#if author}} About the Author {{#if author.image}} {{/if}} {{author.name}} {{#if author.website}} {{author.website}} {{/if}} {{author.bio}} {{/if}}{{/post}} {{> footer}} Once again we have the and handlebars. And our element. But this time the wrapping handlebar is Then we call in the (Not excerpt, because this is the individual page we want to show all of the content in the post.) Another difference here is the 'if' statement which is verifying if there's an author for the post. If there is we'll show a box with the author's image, name, URL and bio. All of these elements are editable in the back-end by the user, and will either show up or not depending on whether they exist. 'default.hbs' and the partial files Now we're going to look at the default.hbs file. So if you haven't made it yet, create a new file. In that file we're going to put all the default things that are needed for our page to display correctly in a browser, mainly the doctype and the , and tags. {{ghost_head}} {{{body}}} {{ghost_foot}}
{{/if}} {{author.name}} {{#if author.website}} {{author.website}} {{/if}} {{author.bio}} {{/if}}{{/post}} {{> footer}} Once again we have the and handlebars. And our element. But this time the wrapping handlebar is Then we call in the (Not excerpt, because this is the individual page we want to show all of the content in the post.) Another difference here is the 'if' statement which is verifying if there's an author for the post. If there is we'll show a box with the author's image, name, URL and bio. All of these elements are editable in the back-end by the user, and will either show up or not depending on whether they exist. 'default.hbs' and the partial files Now we're going to look at the default.hbs file. So if you haven't made it yet, create a new file. In that file we're going to put all the default things that are needed for our page to display correctly in a browser, mainly the doctype and the , and tags. {{ghost_head}} {{{body}}} {{ghost_foot}}
{{#foreach posts}} So to explain what's happening, the very first line is essential to the theme and tell us that this file will be inserted into the content area into the default file. The second line then inserts our header. Instead of putting it into this file we'll create a partial file later in the 'partials' directory. HBS files are just like HTML files in which you can include normal HTML elements. So the next element in the file is a which will hold all of our main content. Then inside of the repeater we'll put our article element that will contain the post. Inside each there will be a with the title and the meta data of the article (author and publish date). After that the actual excerpt. Then a that has our post's tags (in between an 'if' statement) and the share links, with some span's calling in our icon font. Finally we have some pagination, and we eventually call in the which works like the header. So as you can see it's relatively simple code. Obviously any class or ID names are optional for CSS styling. Next up comes the 'post.hbs' file. Which is mostly similar, but with a few additions and modifications. /">← Go Back {{title}} by {{author}} {{date format='DD MMM YYYY'}} {{content}} {{#if tags}} Tags: {{tags separator=" . "}} {{/if}} Share: {{#if author}} About the Author {{#if author.image}} {{/if}} {{author.name}} {{#if author.website}} {{author.website}} {{/if}} {{author.bio}} {{/if}}{{/post}} {{> footer}} Once again we have the and handlebars. And our element. But this time the wrapping handlebar is Then we call in the (Not excerpt, because this is the individual page we want to show all of the content in the post.) Another difference here is the 'if' statement which is verifying if there's an author for the post. If there is we'll show a box with the author's image, name, URL and bio. All of these elements are editable in the back-end by the user, and will either show up or not depending on whether they exist. 'default.hbs' and the partial files Now we're going to look at the default.hbs file. So if you haven't made it yet, create a new file. In that file we're going to put all the default things that are needed for our page to display correctly in a browser, mainly the doctype and the , and tags. {{ghost_head}} {{{body}}} {{ghost_foot}}
{{/if}} {{author.name}} {{#if author.website}} {{author.website}} {{/if}} {{author.bio}} {{/if}}{{/post}} {{> footer}} Once again we have the and handlebars. And our element. But this time the wrapping handlebar is Then we call in the (Not excerpt, because this is the individual page we want to show all of the content in the post.) Another difference here is the 'if' statement which is verifying if there's an author for the post. If there is we'll show a box with the author's image, name, URL and bio. All of these elements are editable in the back-end by the user, and will either show up or not depending on whether they exist. 'default.hbs' and the partial files Now we're going to look at the default.hbs file. So if you haven't made it yet, create a new file. In that file we're going to put all the default things that are needed for our page to display correctly in a browser, mainly the doctype and the , and tags. {{ghost_head}} {{{body}}} {{ghost_foot}}
{{/if}} {{author.name}} {{#if author.website}} {{author.website}} {{/if}} {{author.bio}} {{/if}}{{/post}} {{> footer}} Once again we have the and handlebars. And our element. But this time the wrapping handlebar is Then we call in the (Not excerpt, because this is the individual page we want to show all of the content in the post.) Another difference here is the 'if' statement which is verifying if there's an author for the post. If there is we'll show a box with the author's image, name, URL and bio. All of these elements are editable in the back-end by the user, and will either show up or not depending on whether they exist. 'default.hbs' and the partial files Now we're going to look at the default.hbs file. So if you haven't made it yet, create a new file. In that file we're going to put all the default things that are needed for our page to display correctly in a browser, mainly the doctype and the , and tags. {{ghost_head}} {{{body}}} {{ghost_foot}}
{{> footer}} So to explain what's happening, the very first line is essential to the theme and tell us that this file will be inserted into the content area into the default file. The second line then inserts our header. Instead of putting it into this file we'll create a partial file later in the 'partials' directory. HBS files are just like HTML files in which you can include normal HTML elements. So the next element in the file is a which will hold all of our main content. Then inside of the repeater we'll put our article element that will contain the post. Inside each there will be a with the title and the meta data of the article (author and publish date). After that the actual excerpt. Then a that has our post's tags (in between an 'if' statement) and the share links, with some span's calling in our icon font. Finally we have some pagination, and we eventually call in the which works like the header. So as you can see it's relatively simple code. Obviously any class or ID names are optional for CSS styling. Next up comes the 'post.hbs' file. Which is mostly similar, but with a few additions and modifications. /">← Go Back {{title}} by {{author}} {{date format='DD MMM YYYY'}} {{content}} {{#if tags}} Tags: {{tags separator=" . "}} {{/if}} Share: {{#if author}} About the Author {{#if author.image}} {{/if}} {{author.name}} {{#if author.website}} {{author.website}} {{/if}} {{author.bio}} {{/if}}{{/post}} {{> footer}} Once again we have the and handlebars. And our element. But this time the wrapping handlebar is Then we call in the (Not excerpt, because this is the individual page we want to show all of the content in the post.) Another difference here is the 'if' statement which is verifying if there's an author for the post. If there is we'll show a box with the author's image, name, URL and bio. All of these elements are editable in the back-end by the user, and will either show up or not depending on whether they exist. 'default.hbs' and the partial files Now we're going to look at the default.hbs file. So if you haven't made it yet, create a new file. In that file we're going to put all the default things that are needed for our page to display correctly in a browser, mainly the doctype and the , and tags. {{ghost_head}} {{{body}}} {{ghost_foot}}
So to explain what's happening, the very first line is essential to the theme and tell us that this file will be inserted into the content area into the default file. The second line then inserts our header. Instead of putting it into this file we'll create a partial file later in the 'partials' directory. HBS files are just like HTML files in which you can include normal HTML elements. So the next element in the file is a which will hold all of our main content. Then inside of the repeater we'll put our article element that will contain the post. Inside each there will be a with the title and the meta data of the article (author and publish date). After that the actual excerpt. Then a that has our post's tags (in between an 'if' statement) and the share links, with some span's calling in our icon font. Finally we have some pagination, and we eventually call in the which works like the header. So as you can see it's relatively simple code. Obviously any class or ID names are optional for CSS styling. Next up comes the 'post.hbs' file. Which is mostly similar, but with a few additions and modifications. /">← Go Back {{title}} by {{author}} {{date format='DD MMM YYYY'}} {{content}} {{#if tags}} Tags: {{tags separator=" . "}} {{/if}} Share: {{#if author}} About the Author {{#if author.image}} {{/if}} {{author.name}} {{#if author.website}} {{author.website}} {{/if}} {{author.bio}} {{/if}}{{/post}} {{> footer}} Once again we have the and handlebars. And our element. But this time the wrapping handlebar is Then we call in the (Not excerpt, because this is the individual page we want to show all of the content in the post.) Another difference here is the 'if' statement which is verifying if there's an author for the post. If there is we'll show a box with the author's image, name, URL and bio. All of these elements are editable in the back-end by the user, and will either show up or not depending on whether they exist. 'default.hbs' and the partial files Now we're going to look at the default.hbs file. So if you haven't made it yet, create a new file. In that file we're going to put all the default things that are needed for our page to display correctly in a browser, mainly the doctype and the , and tags. {{ghost_head}} {{{body}}} {{ghost_foot}}
{{!< default}}{{> header}}{{#post}}{{{url}}}">{{title}} by {{author}} {{date format='DD MMM YYYY'}} {{content}} {{#if tags}} Tags: {{tags separator=" . "}} {{/if}} Share: {{#if author}} About the Author {{#if author.image}} {{/if}} {{author.name}} {{#if author.website}} {{author.website}} {{/if}} {{author.bio}} {{/if}}{{/post}} {{> footer}} Once again we have the and handlebars. And our element. But this time the wrapping handlebar is Then we call in the (Not excerpt, because this is the individual page we want to show all of the content in the post.) Another difference here is the 'if' statement which is verifying if there's an author for the post. If there is we'll show a box with the author's image, name, URL and bio. All of these elements are editable in the back-end by the user, and will either show up or not depending on whether they exist. 'default.hbs' and the partial files Now we're going to look at the default.hbs file. So if you haven't made it yet, create a new file. In that file we're going to put all the default things that are needed for our page to display correctly in a browser, mainly the doctype and the , and tags. {{ghost_head}} {{{body}}} {{ghost_foot}}
So to explain what's happening, the very first line is essential to the theme and tell us that this file will be inserted into the content area into the default file. The second line then inserts our header. Instead of putting it into this file we'll create a partial file later in the 'partials' directory. HBS files are just like HTML files in which you can include normal HTML elements. So the next element in the file is a which will hold all of our main content. Then inside of the repeater we'll put our article element that will contain the post. Inside each there will be a with the title and the meta data of the article (author and publish date). After that the actual excerpt. Then a that has our post's tags (in between an 'if' statement) and the share links, with some span's calling in our icon font. Finally we have some pagination, and we eventually call in the which works like the header. So as you can see it's relatively simple code. Obviously any class or ID names are optional for CSS styling. Next up comes the 'post.hbs' file. Which is mostly similar, but with a few additions and modifications. /">← Go Back {{title}} by {{author}} {{date format='DD MMM YYYY'}} {{content}} {{#if tags}} Tags: {{tags separator=" . "}} {{/if}} Share: {{#if author}} About the Author {{#if author.image}}
So to explain what's happening, the very first line is essential to the theme and tell us that this file will be inserted into the content area into the default file. The second line then inserts our header. Instead of putting it into this file we'll create a partial file later in the 'partials' directory. HBS files are just like HTML files in which you can include normal HTML elements. So the next element in the file is a which will hold all of our main content. Then inside of the repeater we'll put our article element that will contain the post. Inside each there will be a with the title and the meta data of the article (author and publish date). After that the actual excerpt. Then a that has our post's tags (in between an 'if' statement) and the share links, with some span's calling in our icon font. Finally we have some pagination, and we eventually call in the which works like the header. So as you can see it's relatively simple code. Obviously any class or ID names are optional for CSS styling. Next up comes the 'post.hbs' file. Which is mostly similar, but with a few additions and modifications. /">← Go Back {{title}} by {{author}} {{date format='DD MMM YYYY'}} {{content}} {{#if tags}} Tags: {{tags separator=" . "}} {{/if}} Share: {{#if author}} About the Author {{#if author.image}}
So to explain what's happening, the very first line is essential to the theme and tell us that this file will be inserted into the content area into the default file. The second line then inserts our header. Instead of putting it into this file we'll create a partial file later in the 'partials' directory. HBS files are just like HTML files in which you can include normal HTML elements. So the next element in the file is a which will hold all of our main content. Then inside of the repeater we'll put our article element that will contain the post. Inside each there will be a with the title and the meta data of the article (author and publish date). After that the actual excerpt. Then a that has our post's tags (in between an 'if' statement) and the share links, with some span's calling in our icon font. Finally we have some pagination, and we eventually call in the which works like the header. So as you can see it's relatively simple code. Obviously any class or ID names are optional for CSS styling. Next up comes the 'post.hbs' file. Which is mostly similar, but with a few additions and modifications. /">← Go Back {{title}} by {{author}} {{date format='DD MMM YYYY'}} {{content}} {{#if tags}} Tags: {{tags separator=" . "}} {{/if}} Share: {{#if author}} About the Author {{#if author.image}}So to explain what's happening, the very first line is essential to the theme and tell us that this file will be inserted into the content area into the default file. The second line then inserts our header. Instead of putting it into this file we'll create a partial file later in the 'partials' directory. HBS files are just like HTML files in which you can include normal HTML elements. So the next element in the file is a which will hold all of our main content. Then inside of the repeater we'll put our article element that will contain the post. Inside each there will be a with the title and the meta data of the article (author and publish date). After that the actual excerpt. Then a that has our post's tags (in between an 'if' statement) and the share links, with some span's calling in our icon font. Finally we have some pagination, and we eventually call in the which works like the header. So as you can see it's relatively simple code. Obviously any class or ID names are optional for CSS styling. Next up comes the 'post.hbs' file. Which is mostly similar, but with a few additions and modifications. /">← Go Back {{title}} by {{author}} {{date format='DD MMM YYYY'}} {{content}} {{#if tags}} Tags: {{tags separator=" . "}} {{/if}} Share: {{#if author}} About the Author {{#if author.image}}So to explain what's happening, the very first line is essential to the theme and tell us that this file will be inserted into the content area into the default file. The second line then inserts our header. Instead of putting it into this file we'll create a partial file later in the 'partials' directory. HBS files are just like HTML files in which you can include normal HTML elements. So the next element in the file is a which will hold all of our main content. Then inside of the repeater we'll put our article element that will contain the post. Inside each there will be a with the title and the meta data of the article (author and publish date). After that the actual excerpt. Then a that has our post's tags (in between an 'if' statement) and the share links, with some span's calling in our icon font. Finally we have some pagination, and we eventually call in the which works like the header. So as you can see it's relatively simple code. Obviously any class or ID names are optional for CSS styling. Next up comes the 'post.hbs' file. Which is mostly similar, but with a few additions and modifications. /">← Go Back {{title}} by {{author}} {{date format='DD MMM YYYY'}} {{content}} {{#if tags}} Tags: {{tags separator=" . "}} {{/if}} Share: {{#if author}} About the Author {{#if author.image}}So to explain what's happening, the very first line is essential to the theme and tell us that this file will be inserted into the content area into the default file. The second line then inserts our header. Instead of putting it into this file we'll create a partial file later in the 'partials' directory. HBS files are just like HTML files in which you can include normal HTML elements. So the next element in the file is a which will hold all of our main content. Then inside of the repeater we'll put our article element that will contain the post. Inside each there will be a with the title and the meta data of the article (author and publish date). After that the actual excerpt. Then a that has our post's tags (in between an 'if' statement) and the share links, with some span's calling in our icon font. Finally we have some pagination, and we eventually call in the which works like the header. So as you can see it's relatively simple code. Obviously any class or ID names are optional for CSS styling. Next up comes the 'post.hbs' file. Which is mostly similar, but with a few additions and modifications. /">← Go Back {{title}} by {{author}} {{date format='DD MMM YYYY'}} {{content}} {{#if tags}} Tags: {{tags separator=" . "}} {{/if}} Share: {{#if author}} About the Author {{#if author.image}}